How To Use Access Raspberry Pi Vnc Over Internet Windows
Are you captivated by the potential of remote access, yearning to unlock the power of your Raspberry Pi from anywhere in the world using your Windows machine? The ability to seamlessly connect to your Raspberry Pi's desktop, control its applications, and manage its files from the comfort of your own computer, regardless of your physical location, is not just a possibility, it's a surprisingly straightforward reality. Let's delve into the steps needed to achieve this remarkable feat, transforming your Raspberry Pi into a readily accessible server, a gateway to your digital world.
The journey to remote Raspberry Pi access over the internet with a Windows client begins with understanding the underlying technologies. We're primarily talking about Virtual Network Computing (VNC). VNC is a graphical desktop-sharing system that uses the Remote Frame Buffer (RFB) protocol to remotely control another computer. It allows you to view and interact with the desktop of a remote machine as if you were sitting in front of it. This is where the magic happens the Raspberry Pi acts as the server, providing its desktop, and your Windows machine becomes the client, receiving and displaying the remote desktop.
To achieve this secure and convenient access, several key steps and considerations must be addressed. The process, while involving a few technicalities, is remarkably approachable, even for those with a limited background in networking. We'll navigate through configuring your Raspberry Pi, setting up port forwarding on your router, and establishing a secure connection using a VNC client on your Windows machine. The goal is a robust and reliable connection that prioritizes both functionality and security.
Before we begin, let's establish the groundwork. First, ensure that your Raspberry Pi is up and running, connected to your local network, and has a static IP address. While not strictly mandatory, a static IP address (or an IP reservation in your router's settings) is highly recommended for the Raspberry Pi to maintain a consistent address, preventing the need to reconfigure your settings if the IP address changes. Secondly, make sure your Windows machine is connected to the internet and has a compatible VNC client installed. These clients are readily available, many of them open-source and free, making the barrier to entry minimal. Lastly, a fundamental understanding of your home network's configuration, especially your router settings, will be invaluable. This understanding allows you to configure the port forwarding necessary for the connection to traverse the internet and reach your Raspberry Pi.
Now, let's dive into the essential steps to enable remote access to your Raspberry Pi from your Windows machine.
Step 1: Setting Up VNC Server on Your Raspberry Pi
The first, and arguably most important, step is to install and configure a VNC server on your Raspberry Pi. The most popular choice, and one that often comes pre-installed in the Raspberry Pi OS, is RealVNC Server. However, other alternatives such as TightVNC or TigerVNC can be employed as well. We'll focus on RealVNC due to its ease of use and its built-in security features.
1. Update Your Raspberry Pi: Start by updating your Raspberry Pi's software. Open a terminal window (or SSH into your Raspberry Pi if you're headless) and run the following commands:
sudo apt update sudo apt upgradeThese commands ensure that your system is up-to-date with the latest security patches and software versions. It's a crucial step for optimal performance and security.
2. Enable VNC Server: RealVNC Server is often included in the Raspberry Pi OS. If it's not installed, you can install it using the following command:
sudo apt install realvnc-vnc-serverAfter the installation process is complete, youll need to enable VNC within the Raspberry Pi's settings.
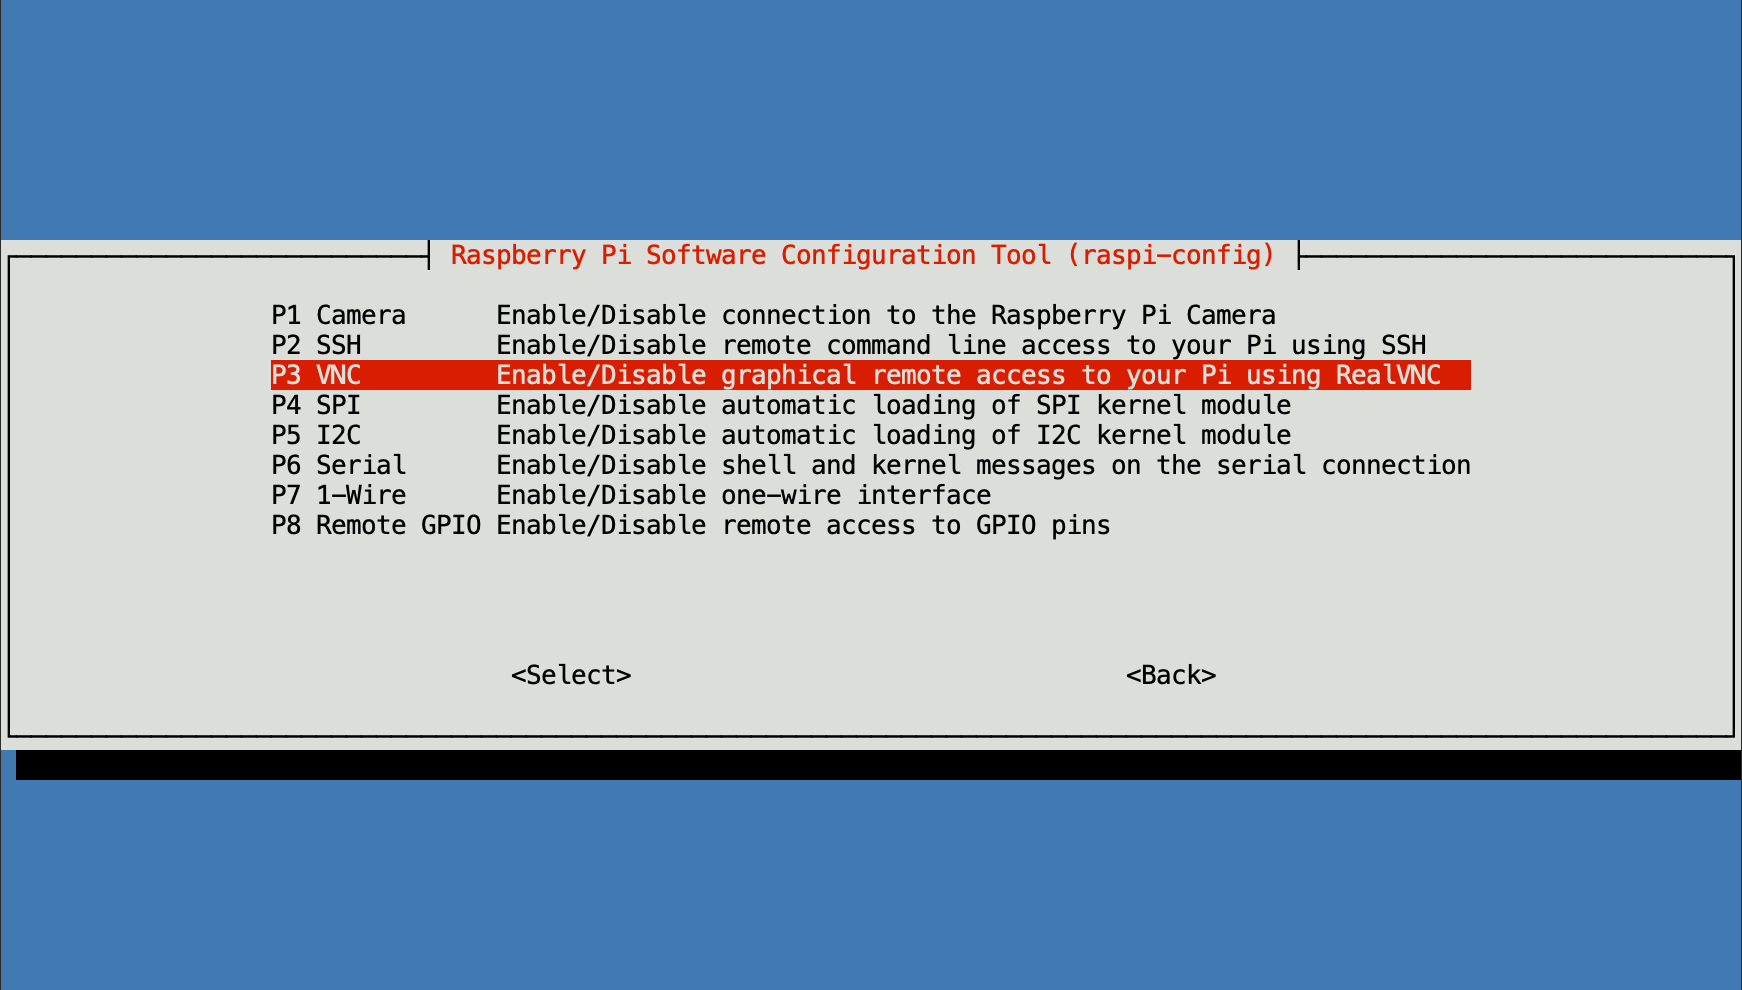
3. Configure VNC Server: Run the command sudo raspi-config in the terminal. This will open the Raspberry Pi configuration menu. Navigate to "Interface Options" and then select "VNC". Enable VNC by choosing "Yes" when prompted. You will be asked to set a password for the VNC connection; make this password strong and memorable. This password protects your Raspberry Pi from unauthorized access.
4. Alternative - GUI Configuration: You can also enable VNC through the Raspberry Pi's graphical user interface (GUI). Click on the Raspberry Pi icon in the top left corner, select "Preferences," and then "Raspberry Pi Configuration." Click on the "Interfaces" tab and ensure that "VNC" is enabled.
With the VNC server configured, your Raspberry Pi is now ready to accept incoming VNC connections.
Step 2: Configuring Your Router for Port Forwarding
The next crucial step is to configure your router to forward incoming VNC connections from the internet to your Raspberry Pi. This involves setting up port forwarding, which is essentially telling your router to redirect traffic coming in from a specific port on the router (such as port 5900, the default for VNC) to the internal IP address and port of your Raspberry Pi.
1. Access Your Router's Configuration: You'll need to access your router's configuration interface. This is typically done by entering your router's IP address in a web browser. The default IP address is often 192.168.1.1 or 192.168.0.1, though it varies depending on the manufacturer. Consult your router's documentation if you don't know its IP address or how to access its settings.
2. Log In: You will be prompted for your router's username and password. These are usually found on a sticker on the router itself, or in the router's documentation. Be aware that these are common vulnerabilities and should be changed if you have access to your router's control panel.
3. Locate Port Forwarding Settings: The location of the port forwarding settings varies depending on the router's brand and model. Look for a section labeled "Port Forwarding," "Virtual Servers," "NAT," or something similar. In this section, you'll create a new rule.
4. Create a Port Forwarding Rule: You will need to fill in the following details for the port forwarding rule:
- Service Name/Description: Give the rule a descriptive name, such as "VNC Raspberry Pi."
- Protocol: Select the protocol for the connection. This is usually TCP.
- External Port/Public Port: Enter the port number that will be used to access your Raspberry Pi from the internet. The default VNC port is 5900. You can use this, or you can choose a different port, although this can lead to some confusion if others try to connect to your pi.
- Internal Port/Private Port: Enter the port number on your Raspberry Pi that VNC is using. This is typically 5900.
- Internal IP Address/Private IP Address: Enter the static IP address of your Raspberry Pi that you set up earlier.
- Enable/Activate: Make sure the rule is enabled.
5. Save Your Settings: Save the changes you've made to your router's settings. The router may need to restart. Once the router has rebooted, your port forwarding rule will be active.
With the port forwarding rule in place, your router will now direct incoming VNC traffic from the internet to your Raspberry Pi.
Step 3: Finding Your Public IP Address
To connect to your Raspberry Pi from the internet, you'll need your public IP address. This is the IP address assigned to your router by your Internet Service Provider (ISP). You can find your public IP address by:
1. Using a Website: Open a web browser on any device connected to your network and search for "what is my IP address." There are many websites that will immediately display your public IP address. Example: www.whatismyip.com
2. Checking Your Router: Some routers display your public IP address in their status or WAN settings. Log in to your router's configuration interface to find this information.
Step 4: Connecting from Your Windows Machine Using a VNC Client
Now it's time to connect to your Raspberry Pi from your Windows machine. This involves installing and configuring a VNC client. Several VNC clients are available, including RealVNC Viewer (from RealVNC, the makers of the VNC server we're using), TightVNC, and others. We'll use RealVNC Viewer in this example, since it's designed for the VNC server you have installed.
1. Download and Install a VNC Client: Download and install a VNC client on your Windows machine. You can download RealVNC Viewer from https://www.realvnc.com/en/connect/download/viewer/
2. Open the VNC Client: Launch the VNC client.
3. Enter the Connection Details: In the VNC client, enter the connection details. This is where you'll combine your public IP address and the port you forwarded.
- Address: Enter your public IP address, followed by a colon (:), and then the port number you forwarded (e.g., 123.45.67.89:5900). If you used the default port 5900, you can often just enter the IP address.
4. Connect: Click "Connect."
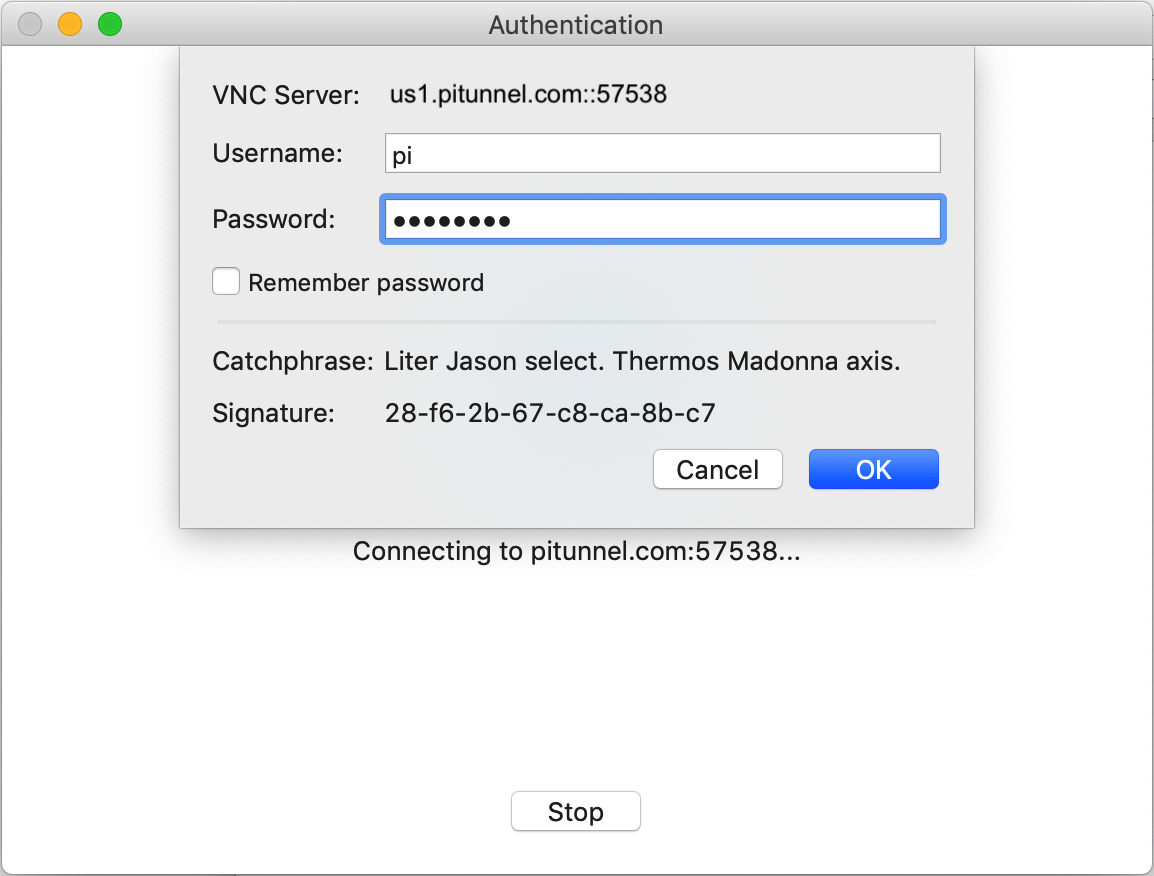
5. Enter Credentials: You will be prompted for the VNC password you set up on your Raspberry Pi. Enter the password and click "OK."
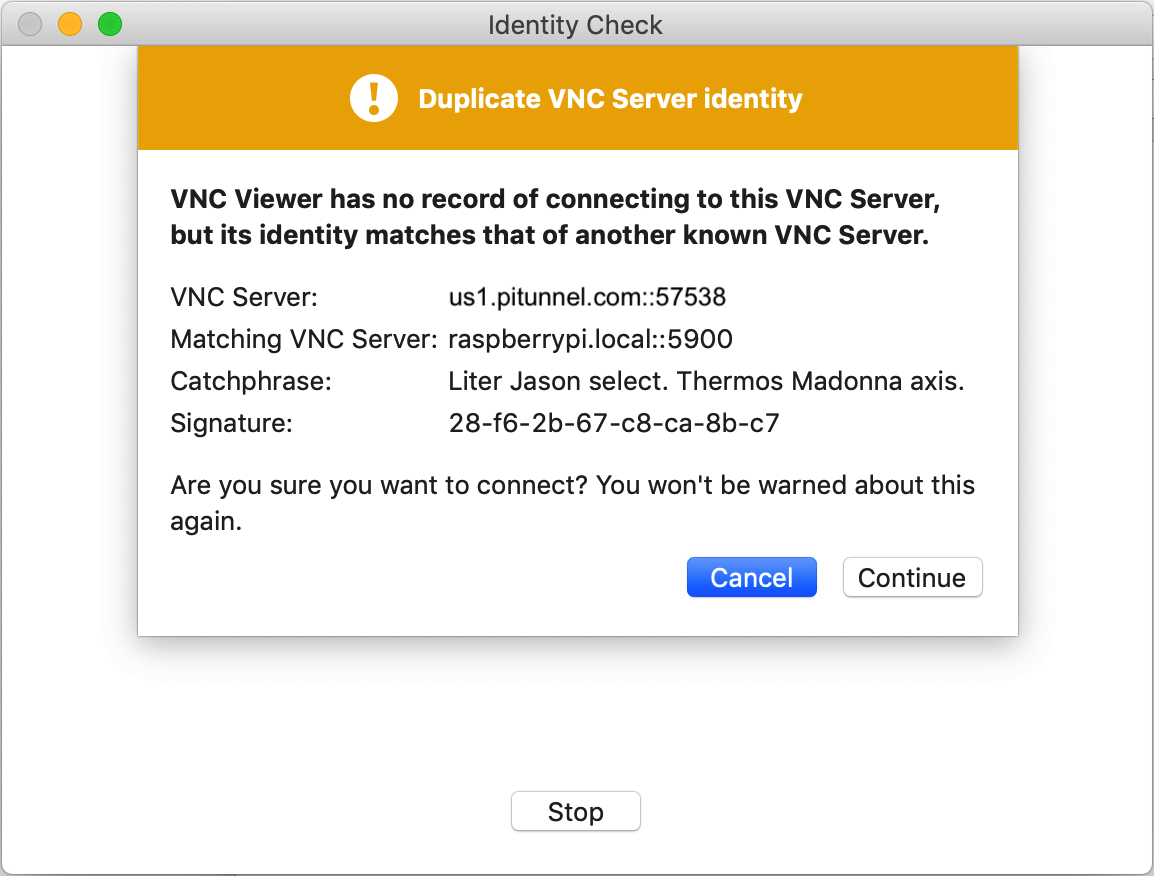
6. Potential Security Warnings: The first time you connect, you may receive a security warning. This is because the connection might not be fully encrypted. Choose to continue. Consider investigating SSH tunneling in more advanced setups for a more secure connection.
If everything is configured correctly, you should now see the desktop of your Raspberry Pi within the VNC client window on your Windows machine. You can now control your Raspberry Pi remotely!
Step 5: Considerations for Security
While VNC provides a straightforward way to access your Raspberry Pi remotely, it's vital to consider security best practices to protect your device and your network. The default VNC configuration might not be as secure as more advanced setups. Here are some key security recommendations:
1. Strong Password: Use a strong, unique password for your VNC connection. Avoid using easily guessable passwords, such as your name, birthday, or common words.
2. Enable Encryption (Recommended): By default, VNC traffic may not be fully encrypted. RealVNC Server (and other VNC server applications) offers encryption options that you should enable. If you're using RealVNC, ensure that the "Encryption" option is set to "Always" or a similar high-security setting in your VNC server configuration. Consult your VNC server documentation to determine how to adjust your encryption settings.
3. Change the Default Port (Optional): While not a guaranteed security measure, changing the default VNC port (5900) can help to reduce the likelihood of automated attacks. Choose a different port number and update your router's port forwarding rule and your VNC client configuration accordingly. However, this does not provide full security on its own.
4. Use SSH Tunneling (Advanced): For a more secure connection, consider using SSH tunneling. SSH (Secure Shell) provides an encrypted tunnel that can be used to forward VNC traffic. This method encrypts the entire VNC connection, protecting your data from eavesdropping. This approach is slightly more complex to set up, but it significantly enhances security.
5. Regularly Update Software: Keep your Raspberry Pi's operating system and all installed software up-to-date with the latest security patches. This helps to mitigate vulnerabilities that could be exploited by attackers.
6. Firewall: Ensure that your Raspberry Pi's firewall (e.g., UFW, Uncomplicated Firewall, which you can install on Raspberry Pi) is enabled and configured to restrict access to your VNC server only to authorized IP addresses. Restrict access to only your home IP address for an added layer of security.
7. Two-Factor Authentication (Optional): Some VNC server implementations and related services support two-factor authentication (2FA). If available, enabling 2FA adds an extra layer of security by requiring a second form of verification (e.g., a code from an authenticator app) in addition to your password.
8. Monitor Logs: Regularly review your Raspberry Pi's logs for any suspicious activity. This will help you identify potential security breaches or unauthorized access attempts. VNC server software and operating systems typically log connection attempts, errors, and other relevant information.
By implementing these security measures, you can significantly reduce the risks associated with remote VNC access to your Raspberry Pi and protect your device and network from unauthorized access.
Step 6: Dealing with Dynamic IP Addresses
One common challenge is dealing with dynamic IP addresses. Your public IP address, assigned by your ISP, is often dynamic, meaning it can change periodically. This can disrupt your remote access, requiring you to reconfigure your VNC client with the new IP address. There are several ways to address this:
1. Static IP Address (Best Solution): The ideal solution is to request a static IP address from your ISP. A static IP address remains the same, eliminating the need to update the IP address in your VNC client. However, static IP addresses often come with an additional cost from your ISP.
2. Dynamic DNS (DDNS): Dynamic DNS services provide a hostname (e.g., myraspberrypi.dyndns.org) that is associated with your current public IP address. When your IP address changes, a DDNS client running on your network (typically on your router or Raspberry Pi) automatically updates the DNS record with the new IP address. You can then connect to your Raspberry Pi using the hostname instead of the IP address. This is a cost-effective solution, but a DDNS provider and a domain name are required. Popular DDNS providers include DynDNS and No-IP.
3. Router Support: Some routers have built-in support for DDNS. If your router supports it, you can configure your DDNS settings directly within your router's configuration interface.
4. DDNS Client on Raspberry Pi: If your router doesn't support DDNS, you can install a DDNS client on your Raspberry Pi. Many DDNS clients are available, and you configure them to update your DNS record with the DDNS provider.
By using a static IP address or implementing DDNS, you can ensure reliable remote access to your Raspberry Pi, even if your public IP address changes.
Step 7: Optimizing the VNC Connection for Performance
Remote desktop connections over the internet can sometimes be slow, especially if you have a slow internet connection or are transferring large amounts of data. Here are some tips to optimize your VNC connection for performance:
1. Adjust VNC Settings: Many VNC clients and servers offer settings to adjust the image quality, color depth, and other performance parameters. Experiment with these settings to find the best balance between image quality and performance. For example, reducing the color depth or image quality can improve the responsiveness of the connection.
2. Optimize Your Internet Connection: Ensure that your internet connection is stable and has sufficient bandwidth. Consider using a wired connection instead of Wi-Fi, especially for the Raspberry Pi, to improve stability and reduce latency. Close unnecessary applications that are using bandwidth on both your Raspberry Pi and your Windows machine.
3. Use a High-Performance VNC Client: Select a VNC client that's known for good performance. Some clients are optimized for remote access and can provide a smoother experience than others.
4. Hardware Acceleration: The Raspberry Pi's hardware can be used to provide an additional boost in performance. Consider enabling hardware acceleration on your Raspberry Pi, as appropriate.
5. Enable Compression: VNC protocols often support data compression. Make sure that compression is enabled in both the VNC server and client to reduce the amount of data that needs to be transmitted.
6. Optimize the Raspberry Pi: Ensure that your Raspberry Pi is running efficiently. Close any unnecessary programs or services that are consuming system resources. Overclocking the Raspberry Pi (within safe parameters) can also improve performance, but this will void the warranty.
By implementing these optimization techniques, you can significantly improve the performance of your remote VNC connection, making it a much more enjoyable experience.
Troubleshooting Common Issues
Despite following the steps, you might encounter some issues. Here are some common problems and their solutions:
1. Cannot Connect:
- Check Your IP Address: Verify that you're using the correct public IP address in your VNC client. If you're using DDNS, make sure the hostname is resolving to the correct IP address.
- Port Forwarding: Double-check your router's port forwarding settings. Ensure that the correct port is forwarded to the correct internal IP address of your Raspberry Pi.
- Firewall: Make sure your firewall on your Windows machine and Raspberry Pi are not blocking the VNC connection. For example, open port 5900 in Windows Firewall.
- VNC Server Running: Ensure the VNC server is running on your Raspberry Pi.
- Network Connectivity: Verify that your Raspberry Pi is connected to the internet and can communicate with other devices on your network. Ping the Raspberry Pi from your Windows machine to test connectivity.
2. Slow Connection:
- Optimize VNC Settings: Adjust the image quality and color depth in your VNC client.
- Check Internet Speed: Ensure you have a stable and sufficiently fast internet connection on both ends.
- Reduce Bandwidth Usage: Close any applications that are consuming bandwidth.
3. Security Issues:
- Strong Password: Use a strong password for your VNC connection.
- Encryption: Enable encryption in your VNC server settings.
- SSH Tunneling: Consider using SSH tunneling for a more secure connection.
4. Incorrect Password:
- Verify Password: Double-check that you're entering the correct password in your VNC client.
- Reset Password: If you've forgotten your password, you may need to reconfigure your VNC server on your Raspberry Pi to reset it.
Conclusion
Accessing your Raspberry Pi via VNC over the internet using your Windows machine is a versatile tool, opening doors to remote control, file management, and much more. This article has provided a comprehensive guide to setting up this connection, covering everything from VNC server setup to port forwarding and security considerations. By carefully following the steps outlined, you can transform your Raspberry Pi into a remote gateway. Remember that security is paramount. Implement strong passwords, encrypt your connections, and consider SSH tunneling for an even more secure experience. With the right configuration and precautions, the world of your Raspberry Pi is just a click away, no matter where you are.

