Secure Remote SSH For IoT Devices: Access Behind Router
Are you wrestling with the challenge of accessing your Internet of Things (IoT) devices remotely? The ability to securely manage and control your IoT devices from anywhere in the world is no longer a luxury; it's a necessity in today's connected landscape.
The proliferation of IoT devices in homes, businesses, and industrial settings has created a demand for robust and secure remote access solutions. Whether it's a Raspberry Pi controlling your smart home, an Arduino monitoring environmental conditions, or a more complex setup involving an NVIDIA Jetson, the need to connect to these devices from afar is undeniable. This guide delves into the practical steps of setting up remote Secure Shell (SSH) access for your IoT devices, particularly those residing behind a Network Address Translation (NAT) router or firewall. We will explore the core concepts, practical implementations, and security considerations necessary to establish a reliable and secure connection. This approach empowers you to manage and troubleshoot your devices effectively, regardless of their physical location. This article will walk you through the process, ensuring that you can securely manage your devices efficiently.
Here's a breakdown of the key elements and features that enable successful remote SSH access for your IoT devices. We will explore the intricacies of port forwarding, SSH tunneling, and the use of cloud-based solutions like SocketXP, to ensure that your connection is not only functional but also secure. Well explore the best practices, from initial configuration to ongoing maintenance. By mastering these skills, you can unlock the full potential of your IoT devices and harness the power of remote access.
Before we dive deep, lets establish the fundamental concept. Consider the scenario: You have an IoT device (lets say, a Raspberry Pi) tucked away behind your home router. You want to access it from your office, a coffee shop, or perhaps from the other side of the world. How do you do it securely without exposing your device to the open internet? The answer lies in SSH, a secure protocol, and the various methods to circumvent the challenges posed by NAT and firewalls.
In the world of IoT, secure and reliable access to your devices is paramount. The ability to remotely manage and monitor your devices opens up a world of possibilities, from troubleshooting and maintenance to real-time data collection and control. This capability is particularly crucial when your IoT devices are deployed in remote locations, where physical access is limited or impractical. Imagine a sensor network in a remote agricultural setting, a weather station in a mountain range, or a security camera overlooking a distant property. Without remote access, these devices would be virtually useless when you need to update them, troubleshoot them, or retrieve data.
Why Remote SSH Access is Essential:
- Efficient Management: Remotely access and manage your devices without needing physical presence.
- Troubleshooting: Quickly diagnose and resolve issues from any location.
- Data Retrieval: Access and download data from your devices in real time.
- Software Updates: Keep your devices updated with the latest software and security patches.
- Cost Savings: Reduce travel costs and minimize downtime.
Given these compelling advantages, the ability to set up remote SSH access for your IoT devices is a critical skill for anyone involved with the Internet of Things.
Here is a table showcasing the key components, advantages and Disadvantages of remote SSH access and its role in your IoT project:
| Component | Description | Advantages | Disadvantages |
|---|---|---|---|
| SSH Client | The software installed on your device that initiates the SSH connection. | Secure communication, data integrity, remote control | Requires proper configuration and can be complex to set up |
| SSH Server | The software running on the target device that accepts SSH connections. | Secured and encrypted connection. | Security vulnerabilities could be exploited. |
| Router (NAT) | The device that connects your local network to the internet and performs network address translation. | Provides network isolation, hides private IPs | Requires port forwarding setup, security depends on router's security posture |
| Firewall | A security system that controls network traffic based on predefined rules. | Protects against unauthorized access, filters malicious traffic | Can block legitimate traffic if not configured correctly, management overhead |
| SSH Tunneling | A method that uses SSH to create a secure tunnel for other network traffic. | Secure data transfer, bypasses firewalls and NAT | Configuration complexities |
| SocketXP | A cloud-based service that provides secure remote access and device management. | Simplified setup, secure connections, remote device management, no public IP needed. | Relies on a third-party service, may have cost implications. |
This guide will walk you through the process of setting up remote SSH access to IoT devices behind a router. This ensures that you can manage your devices securely and efficiently. Remote SSH access is crucial for managing IoT devices efficiently, especially when they are located in remote locations. Whether you're a hobbyist or a professional, understanding how to set up remote SSH access for your IoT devices is essential.
The core of remote SSH access relies on establishing a secure connection between your remote machine (e.g., your laptop) and your IoT device. The SSH protocol, built upon encryption, is the cornerstone of this process, ensuring that all communication is protected from prying eyes. In most cases, the IoT device will be behind a router, which introduces challenges that must be addressed. Let's explore the key methods to overcome these obstacles:
1. Port Forwarding: This method allows you to access your IoT device by forwarding a specific port on your router to the device's internal IP address. It's like setting up a direct path from the outside world to your device. Open your router settings from your web browser. This usually involves logging into your router's administration panel, navigating to the port forwarding section, and configuring a rule that directs traffic from a specific port (e.g., port 22 for SSH) on your router's public IP address to the internal IP address of your IoT device on port 22. For example, if your router has a public IP of 192.168.1.100 and your IoT device's internal IP is 192.168.1.10, you might forward port 22 on your router to port 22 on 192.168.1.10. Once configured, you can SSH to your device using your routers public IP address. However, this method exposes your device to the internet and requires a static or dynamic DNS to access the router's IP address if it is not static.
2. SSH Tunneling: This creates a secure tunnel through an intermediary, such as a server with a public IP address. You initiate an SSH connection from your IoT device to the remote server. Then, from your remote machine, you connect to that server, and the traffic is forwarded securely to your IoT device. This is often referred to as a "reverse SSH tunnel" and is a good choice if your IoT device is behind a firewall or NAT. This method is the primary method for users to securely communicate with remote servers, networks, and devices through established firewalls and gateway routers using an assigned, protected port. It allows internet traffic to travel between local and remote devices. By leveraging the versatility of the Raspberry Pi and the robustness of SSH, you can create a reliable remote connection without spending a dime. In this article, we will explore how to set up this system step by step.
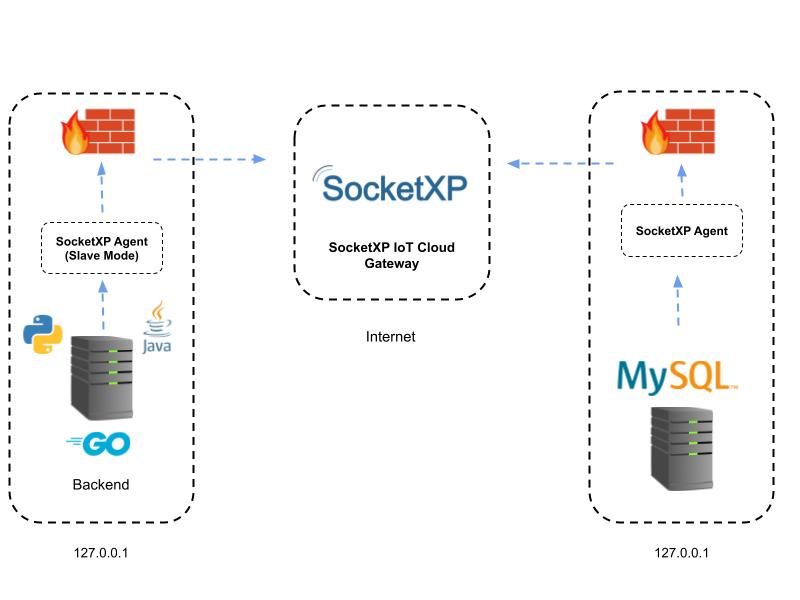
3. Cloud-Based Solutions (SocketXP): Services like SocketXP provide a simplified approach to remote access. These services provide a secure tunnel without requiring you to expose your device to the internet or manage complex configurations. They handle the intricacies of NAT traversal and provide a user-friendly interface for accessing your devices.
The basic idea behind using SSH tunnels is that the tunnel encrypts all traffic sent through it. This means that even if someone were to intercept the data, they would not be able to read it because it would be scrambled. In the context of SSH, tunneling involves forwarding network traffic through an encrypted SSH connection. This is particularly useful when accessing resources behind a firewall or NAT, or when you want to ensure all your network traffic is encrypted. Imagine the tunnel as a secure pipe. Your traffic enters at one end, gets encrypted, travels through the tunnel, and emerges decrypted at the other end.
Step-by-Step Guide: Remote SSH Access
Let's explore how to set up a remote SSH connection for your Raspberry Pi, using a Raspberry Pi as an example, although the process can be applied to various other IoT devices.
1. Prepare Your IoT Device (Raspberry Pi)
- Operating System: Ensure your Raspberry Pi is running a suitable operating system, like Raspberry Pi OS (formerly Raspbian).
- SSH Client: SSH is usually pre-installed on most Linux distributions. If not, install an SSH client.
- IP Address: Determine the local IP address of your Raspberry Pi within your network.
- Enable SSH: SSH is often disabled by default. Youll need to enable it. You can do this through the Raspberry Pi configuration menu or via command line.
2. Configuring Router (Port Forwarding - Optional but often necessary)
- Access Router Settings: Open your router's settings via a web browser.
- Find Port Forwarding Section: Look for "Port Forwarding", "Virtual Servers", or a similar option in your router's settings.
- Create a Rule:
- Port: Typically, SSH uses port 22.
- Internal IP Address: Enter the local IP address of your Raspberry Pi.
- Protocol: TCP.
3. Connecting from Outside Your Network
- Find your Public IP: Use a website like "whatismyip.com" to find your public IP address.
- SSH into your Raspberry Pi:
- Open a terminal or command prompt on your remote machine (laptop, etc.).
- Use the command:
ssh pi@your_public_ip_address(replace "your_public_ip_address" with your router's public IP). - You may need to specify the port if you have configured a non-standard port in your router settings:
ssh -p [port_number] pi@your_public_ip_address
4. Securing Your Connection
- Change Default Password: The default password for the "pi" user is "raspberry". Change this immediately.
- Use SSH Keys: Employ SSH keys for more secure authentication. This eliminates the need for passwords, and is significantly more secure.
- Firewall: Implement a firewall on your Raspberry Pi to restrict access.
Advanced Techniques and Considerations:
Here are some advanced techniques that will add extra layers of security and better usability.
- Dynamic DNS: If your public IP address changes, use a Dynamic DNS service to keep track of your IP address.
- VPNs: For enhanced security, consider using a VPN. This encrypts all traffic between your device and the VPN server.
- Monitoring: Set up monitoring tools to track your device's performance and security.
Troubleshooting Common Issues
Setting up remote SSH access may not always be smooth sailing. Here are some common problems and how to resolve them:
- Connectivity Issues:
- Check Internet Connection: Ensure your IoT device and your remote machine have internet connectivity.
- Verify IP Addresses: Double-check the internal IP address of your IoT device and your router's public IP address.
- Test Port Forwarding: Use online port scanners to verify that port 22 (or your chosen port) is open on your router.
- Login Problems:
- Password Issues: Verify that you are using the correct username and password.
- Key-Based Authentication: Ensure that SSH keys are properly configured and that the public key is added to the authorized_keys file.
- Firewall Problems:
- Check Firewall Rules: Make sure your firewall rules allow SSH traffic on the configured port.
- Temporarily Disable Firewall: Temporarily disable your firewall to determine if it is blocking SSH traffic.
Exploring Cloud-Based Solutions
While port forwarding and SSH tunneling offer excellent DIY solutions, cloud-based services like SocketXP, offer a simplified experience, especially for those less familiar with networking concepts. These services often provide:
- Simplified Setup: Easy-to-use interfaces make configuration straightforward.
- Automatic NAT Traversal: Automatically handle NAT traversal without manual router configuration.
- Secure Connections: Provide secure, encrypted connections, often using SSL/TLS.
- Device Management: Offer tools for managing multiple devices from a central dashboard.
This approach has its own pros and cons:
- Advantages:
- Reduced complexity.
- No need for a static public IP address.
- Simplified management of multiple devices.
- Disadvantages:
- Requires relying on a third-party service.
- May involve subscription fees.
- You are dependent on the reliability and security of the service provider.
Security Best Practices for Remote SSH Access
Security is paramount when configuring remote SSH access. Here are some crucial security practices you should implement:
- Strong Passwords: Use strong, unique passwords and change them regularly. Do not use the default password.
- SSH Keys: Implement SSH key-based authentication instead of password-based authentication. This is significantly more secure.
- Disable Password Authentication: Once you have set up SSH key-based authentication, disable password authentication in your SSH configuration.
- Firewall Configuration: Configure your firewall to only allow SSH traffic from trusted IP addresses.
- Port Hardening: Change the default SSH port (22) to a non-standard port. This can help to reduce automated attacks.
- Regular Updates: Keep your SSH server and all related software up to date.
- Two-Factor Authentication (2FA): Consider implementing 2FA for an extra layer of security.
- Monitoring: Monitor your SSH logs for any suspicious activity.
The Internet of Things and the Future of Remote Access
The Internet of Things (IoT) is rapidly evolving. As IoT devices become more sophisticated, the demand for reliable and secure remote access will only continue to grow. This technology will be at the forefront of remote IoT management. As the IoT landscape matures, we can expect to see greater integration of cloud-based solutions, improved security protocols, and more user-friendly interfaces. The ability to remotely manage and access these devices will be paramount. Whether you're a hobbyist, a tech enthusiast, or an IT professional, understanding the fundamentals of remote SSH access is a valuable skill.


 devices remotely? The ability to securely manage and control your IoT devices fr)