How To Use Ssh Iot Device Through Router
Are you tired of the limitations that routers and firewalls place on your access to Internet of Things (IoT) devices? Unlocking secure, remote SSH connections to your IoT devices, even when they're hidden behind a router, is not just possible; it's a fundamental skill for anyone serious about managing their connected devices.
The ability to securely connect to and manage your IoT devices remotely is no longer a luxury, but a necessity in today's increasingly connected world. Whether you're an enthusiast tinkering with a Raspberry Pi or a professional managing a fleet of industrial sensors, remote SSH access provides a critical lifeline to your devices. SSH (Secure Shell) tunneling is the primary method, offering a robust, encrypted pathway through firewalls and routers. This allows internet traffic to travel securely between your local and remote devices. However, many IoT enthusiasts and professionals find themselves challenged when trying to establish secure remote SSH connections behind the often-complex barrier of a router.
Let's delve into the specifics of how this is achieved. The core of the process involves several key steps, beginning with the IoT device itself and extending to your router's configuration.
The Key Components and Setup: A Step-by-Step Guide
To successfully implement remote SSH access to your IoT devices, youll need to ensure you have the following in place:
- IoT Device with SSH Support: This is the starting point. The IoT device must be capable of running an SSH server. Most modern devices, particularly those running Linux-based operating systems (like Raspberry Pi), readily support SSH. Check the device's settings menu or documentation to confirm SSH functionality and to enable the service if it's not already active.
- A Router with Port Forwarding Capabilities: Your router is the gatekeeper to your home network. You'll need a router that allows you to configure port forwarding. This is the mechanism that directs incoming traffic on a specific port (usually port 22 for SSH) to the internal IP address of your IoT device. Almost all modern routers offer this functionality.
- Public IP Address for Your Router: To access your IoT device from outside your home network, your router must have a public IP address. This is the address that identifies your home network on the internet. Most home internet connections are assigned a public IP address dynamically by your Internet Service Provider (ISP).
- The IoT Device's IP Address: You need to know the internal IP address assigned to your IoT device by your router. You can usually find this in your router's administration interface, often under a section labeled "Attached Devices" or "DHCP Client List." Alternatively, you might be able to obtain the IP address directly from the device itself (e.g., by logging into a command line interface).
- An SSH Client: You'll need an SSH client on the computer you're using to access your IoT device. Popular clients include the built-in SSH client in Linux and macOS, or PuTTY for Windows. These tools facilitate the secure connection.
Setting up Port Forwarding: The Router's Role
The most crucial configuration step is setting up port forwarding on your router. Here's how to approach it:
- Access Your Router's Configuration Page: Open a web browser and type in your router's IP address (usually something like 192.168.1.1 or 192.168.0.1). You'll likely be prompted for a username and password. These are usually found on a sticker on your router, or in its documentation.
- Find the Port Forwarding Section: Navigate to the port forwarding or virtual servers section of your router's settings. The exact location will vary depending on your router's brand and model. Look for terms like "Port Forwarding," "Virtual Servers," or similar.
- Create a New Port Forwarding Rule: You'll need to create a new rule. This involves specifying the following information:
- Service Name: You can name the rule something descriptive, like "SSH_IoT" or "RaspberryPi_SSH."
- Protocol: Select TCP (most SSH implementations use TCP).
- External Port: Enter the port you want to use for external access (this is the port you'll use to connect from outside your network). The default is usually 22, but for security reasons, it's often recommended to choose a different, less common port.
- Internal Port: Enter 22 (or the port your SSH server is configured to listen on on your IoT device).
- Internal IP Address: Enter the internal IP address of your IoT device. This is the IP address the router has assigned to the device (e.g., 192.168.1.100).
- Save the Rule: Save the port forwarding rule. The router might require a reboot to apply the changes.
Connecting to Your IoT Device Remotely
Once the port forwarding is set up, you can connect to your IoT device from anywhere with an internet connection. Here's how to do it:
- Determine Your Public IP Address: You need to know your router's public IP address. You can find this by searching "what is my ip" on Google, or by visiting a website that displays your IP address (e.g., whatismyip.com).
- Use Your SSH Client: Open your SSH client (e.g., PuTTY, Terminal on macOS/Linux). Enter the following information:
- Host Name (or IP address): Enter your router's public IP address.
- Port: Enter the external port you configured in your router's port forwarding settings (e.g., if you used port 2222, enter 2222).
- Connection Type: Select SSH.
- Username and Password: Enter the username and password you use to log into your IoT device via SSH.
- Establish the Connection: Connect. If everything is configured correctly, you should be prompted for your SSH credentials (username and password for the IoT device). Once authenticated, you'll have a secure terminal session to your IoT device.
Dynamic DNS and Handling Changing IP Addresses
One potential challenge is that your public IP address might change over time. This is common with dynamic IP addresses assigned by ISPs. To address this, you can use a Dynamic DNS (DDNS) service. These services provide a hostname (e.g., myiotdevice.example.com) that always points to your current public IP address, even if it changes. You configure your router with the DDNS service credentials, and the router automatically updates the hostname with the new IP address.
Enhancing Security
Securing your SSH connection is paramount. Here are some essential security best practices:
- Change the Default SSH Port: As mentioned earlier, change the default SSH port (22) to a less common port. This can help to reduce the number of automated attacks targeting your device.
- Use Strong Passwords: Always use strong, unique passwords for your SSH users. Avoid easily guessable passwords or using the same password for multiple accounts.
- Implement SSH Key Authentication: This is a more secure method than password authentication. With SSH key authentication, you generate a key pair (a public key and a private key). You put the public key on your IoT device, and use the private key on your client machine. This eliminates the need for passwords and is significantly more secure.
- Disable Password Authentication (After Implementing Key Authentication): Once you've confirmed SSH key authentication is working, disable password authentication on your IoT device. This forces users to use keys and eliminates a major attack vector.
- Keep Your System Updated: Regularly update the operating system and all software on your IoT device to patch any security vulnerabilities.
- Use a Firewall on Your IoT Device: Consider using a firewall (like `ufw` on Ubuntu/Debian) to further restrict access to your device. Configure the firewall to only allow SSH connections from your trusted IP addresses.
Alternatives and Additional Techniques
While port forwarding is a standard approach, other methods exist, each with its own pros and cons:
- Reverse SSH Tunneling: If you can't configure port forwarding on your router (e.g., you're behind a restrictive network), you can use reverse SSH tunneling. This involves setting up an SSH server on a machine you can access and then tunneling connections from your IoT device to that server. You then access your IoT device by connecting to the SSH server.
- VPN (Virtual Private Network): A VPN creates an encrypted connection between your device and a VPN server. Once connected, you can access your IoT device as if it were on the same local network as the VPN server. This is a very secure method. You would need to set up a VPN server (e.g., on a Raspberry Pi or using a commercial VPN service).
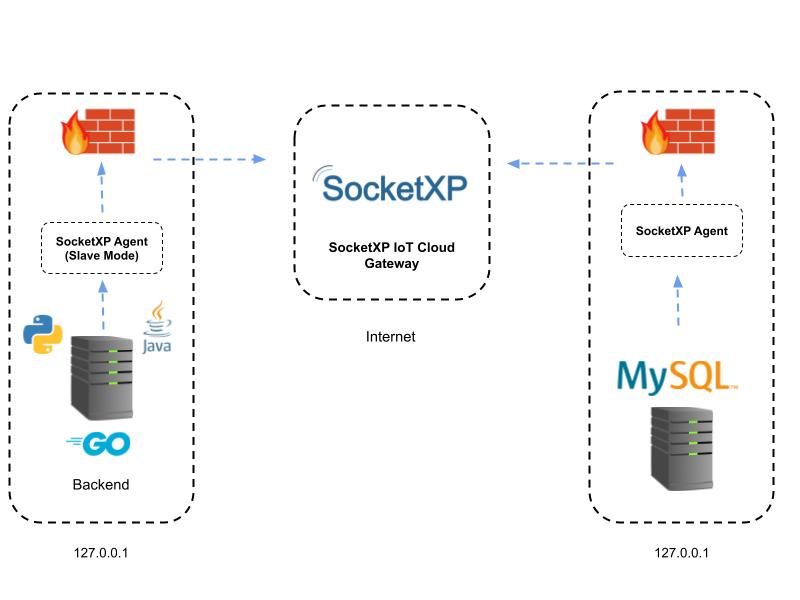
- Cloud-Based Solutions (e.g., SocketXP, Macchina.io Remote): Several cloud-based services simplify remote access. These often involve installing an agent on your IoT device that establishes a secure connection to their servers, allowing you to connect without needing to configure port forwarding. These often offer additional features, such as device management and over-the-air updates. However, you should carefully evaluate the security and privacy policies of any cloud-based service before using it.
- Using Tools like Pinggy.io: Tools such as Pinggy.io allow you to create secure tunnels, simplifying remote access without complex configuration.
Troubleshooting Common Issues
If you're having trouble connecting, here's a checklist to help you diagnose the problem:
- Double-check the IP Addresses: Verify that you're using the correct public IP address of your router. Also, ensure you have the correct internal IP address of your IoT device.
- Verify Port Forwarding Configuration: Carefully review your port forwarding rule on your router. Ensure the correct ports, protocols, and IP addresses are configured.
- Check the SSH Service on Your IoT Device: Ensure the SSH service is running and enabled on your IoT device. You can often check this using the command line.
- Firewall Rules: If you have a firewall enabled on your IoT device or on your computer, ensure it's not blocking SSH traffic.
- Test From a Different Network: Try connecting from a different network (e.g., using your phone's mobile data) to rule out any local network issues.
- Router Reboot: Sometimes, a simple router reboot can resolve connection issues.
Use of SSH Client Tools
Numerous client tools simplify and enhance the SSH experience. The following tools can be used to securely manage and transfer data to your IoT devices:
- scp (Secure Copy): Transfers files securely between your local machine and the IoT device.
- sftp (SSH File Transfer Protocol): An interactive file transfer program. It is often considered a more flexible and feature-rich alternative to SCP.
- PuTTY: A popular free and open-source SSH client for Windows, known for its straightforward interface.
These tools, all of which are command-line based, provide you with the ability to easily transfer or manage data from the comfort of your primary computer.
Security Best Practices for Remote Access
Securing your IoT devices is of paramount importance. Here are key security best practices to consider:
- Regular Software Updates: Keep the operating system and all software on your IoT devices updated to patch known vulnerabilities.
- Strong Authentication: Implement robust authentication methods, using strong passwords and SSH key-based authentication.
- Network Segmentation: Isolate your IoT devices on a separate network segment from your main network to limit the impact of a potential security breach.
- Monitor Network Traffic: Use network monitoring tools to detect any suspicious activity or unauthorized access attempts.
- Disable Unnecessary Services: Disable any services on your IoT devices that you don't need to reduce the attack surface.
- Audit and Review Security Regularly: Perform regular security audits to assess the effectiveness of your security measures and identify areas for improvement.
AWS IoT Instances and Secure Connections
If you're using AWS IoT instances, securing your remote SSH access is still crucial, and similar principles apply. AWS provides a range of security tools and services, and the following are important considerations:
- AWS IAM (Identity and Access Management): Use IAM to manage user access to your AWS resources, including EC2 instances (which might host your IoT devices).
- Security Groups: Configure security groups to control inbound and outbound traffic to your EC2 instances. This allows you to define rules that allow SSH traffic on port 22 (or your custom port) only from trusted sources.
- Key Pairs: Use SSH key pairs to authenticate to your EC2 instances. AWS manages the public key, and you'll use the private key.
- VPC (Virtual Private Cloud): Consider using a VPC to isolate your EC2 instances and create a private network.
- Monitoring and Logging: Use AWS CloudWatch to monitor your instances' performance and security logs to detect any anomalies.
Conclusion
Accessing your IoT devices remotely via SSH is a powerful way to manage and monitor them. By understanding the fundamentals of SSH tunneling, port forwarding, and security best practices, you can establish secure and seamless connections. Whether you are an enthusiast or a professional, mastering the art of remote SSH is a valuable skill in today's connected world.
| Aspect | Details |
|---|---|
| Core Technology | SSH (Secure Shell) tunneling for secure communication |
| Primary Function | Secure remote access to IoT devices |
| Key Components | IoT device with SSH support, router with port forwarding, public IP, device IP, SSH client. |
| Router Configuration | Port forwarding: forwarding traffic on a specific port to the internal IP address of the IoT device. |
| Connecting Remotely | Use SSH client, enter public IP and port, SSH credentials. |
| Security Measures | Strong passwords, SSH key authentication, disable password authentication, firewall, regular updates. |
| Alternative Methods | Reverse SSH tunneling, VPNs, Cloud-based solutions (SocketXP, Macchina.io). |
| Troubleshooting | Check IP addresses, verify port forwarding, check SSH service, firewall rules. |
| AWS IoT Instances | IAM, Security Groups, key pairs, VPC, monitoring. |
| Tools | scp, sftp, PuTTY |
| Dynamic DNS | Use a Dynamic DNS service to have a hostname that is always pointing at the IP. |
Reference
For further information and detailed tutorials, consult the following resources:
- SSH.com Academy - SSH Tunneling
- AWS IoT Security Best Practices


![How to Access IoT Devices Remotely with SSH [6 Easy Steps]](https://www.trio.so/blog/wp-content/uploads/2024/10/Access-IoT-Devices-Remotely-Using-SSH.webp)

 devices? Unlocking secure, remote SSH connections t)